If your into garages, gadgets, or mechanical things… you’ve got to watch this.
If you plan on doing something similar for your garage, be sure to consult a structural engineer and properly calculate loads to ensure safety.
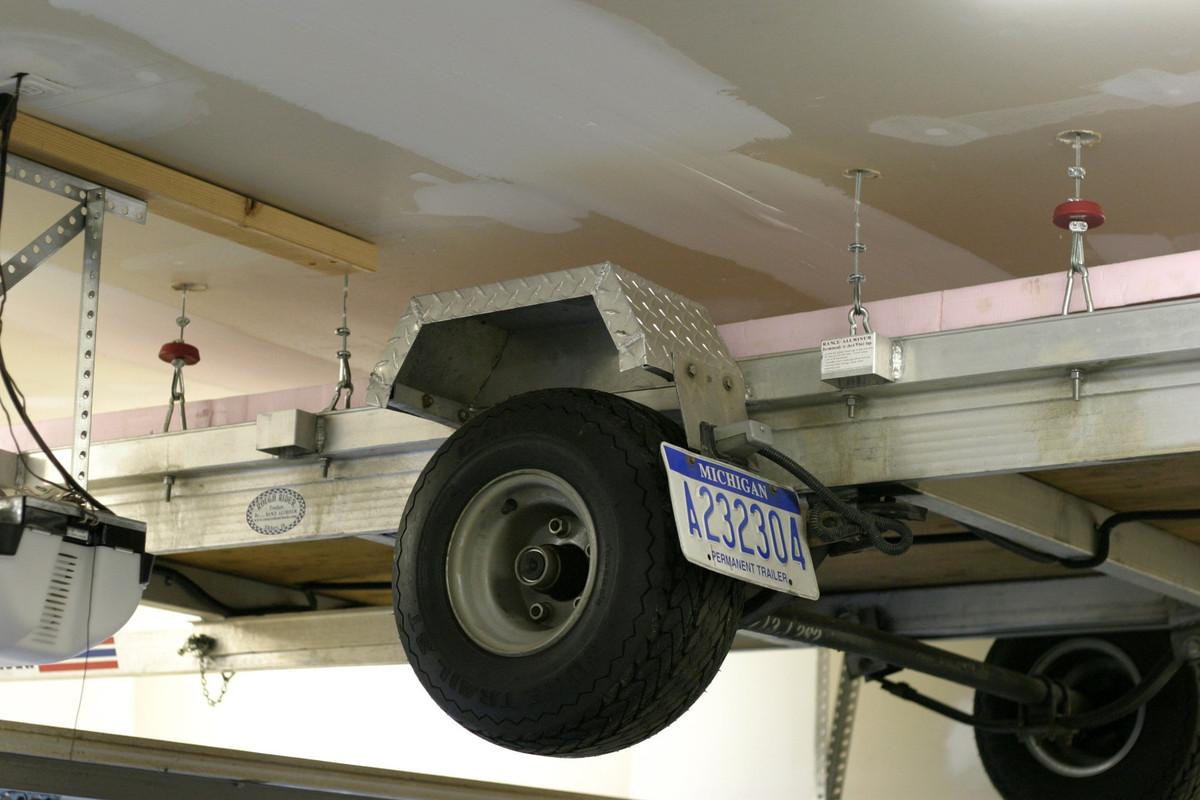
As a woodworker, you gotta have the ability to haul lumber and equipment. I don’t have a truck. So, I did the next best thing and bought a trailer. It’s an awesome trailer. It can tip pivot (for loading a lawn tractor) and its made from lightweight aluminum.
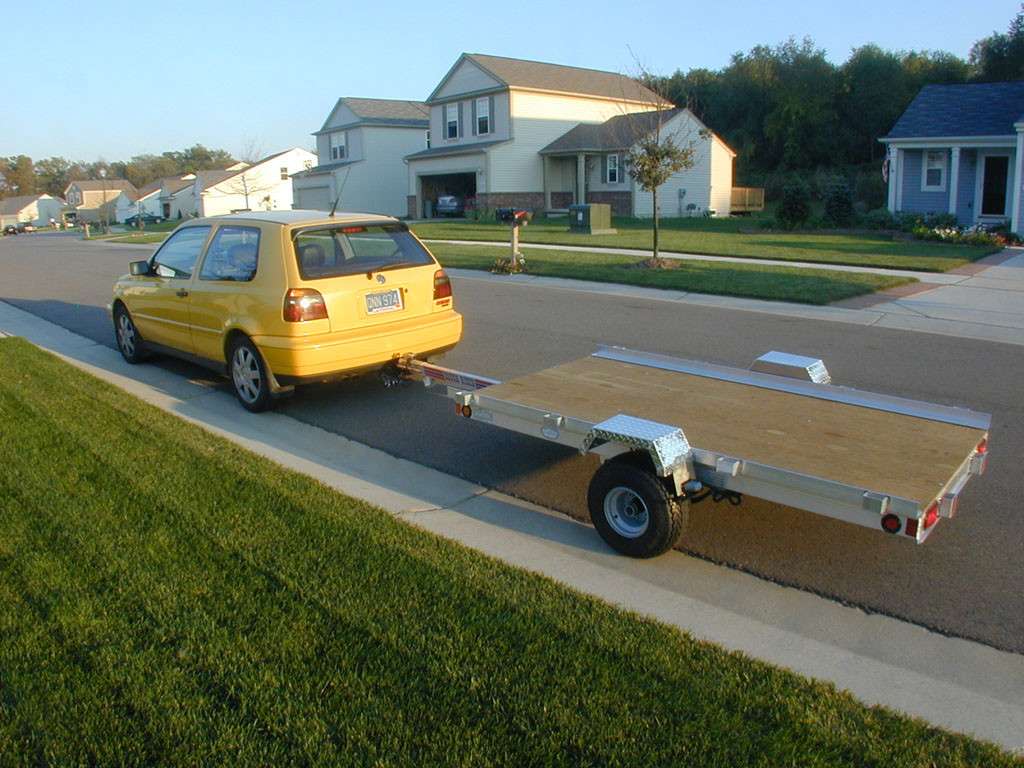
My wife was surprised by my unannounced quick purchase. She didn’t see the value in spending $750 for this behemoth. Thankfully, she has realized it’s value many times over… since being used on many projects around the house.
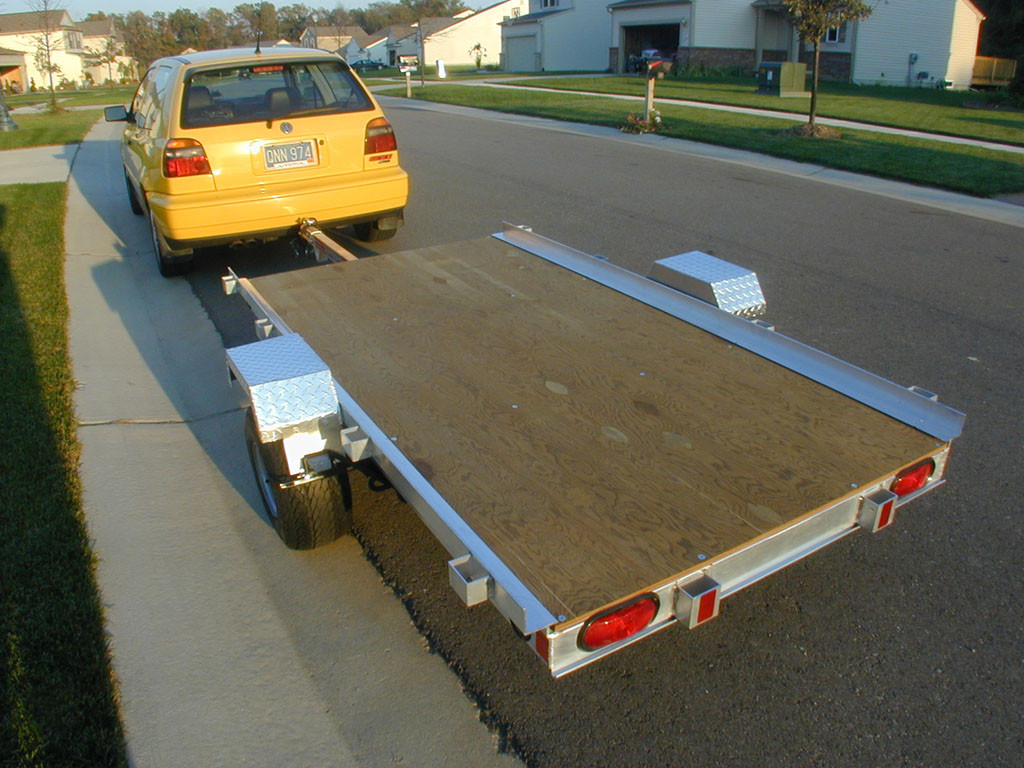
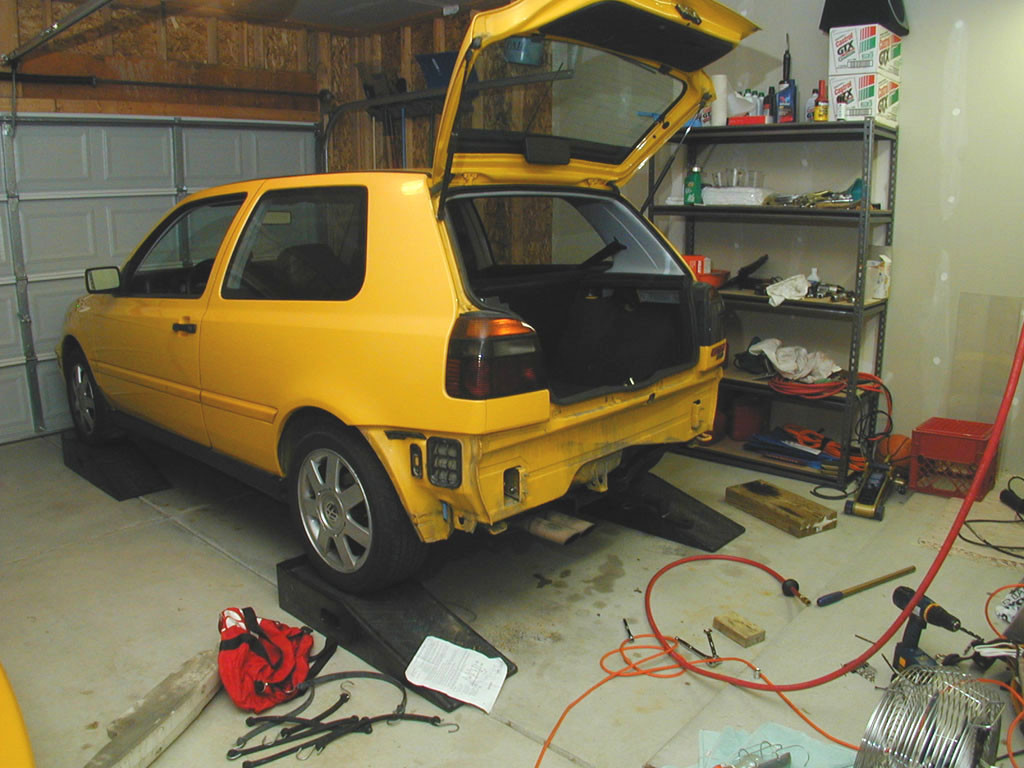
My Volkswagen Golf GTI VR6 isn’t known as a vehicle for hooking a trailer to, but after a fair bit of effort, I was able to attach a trailer hitch.
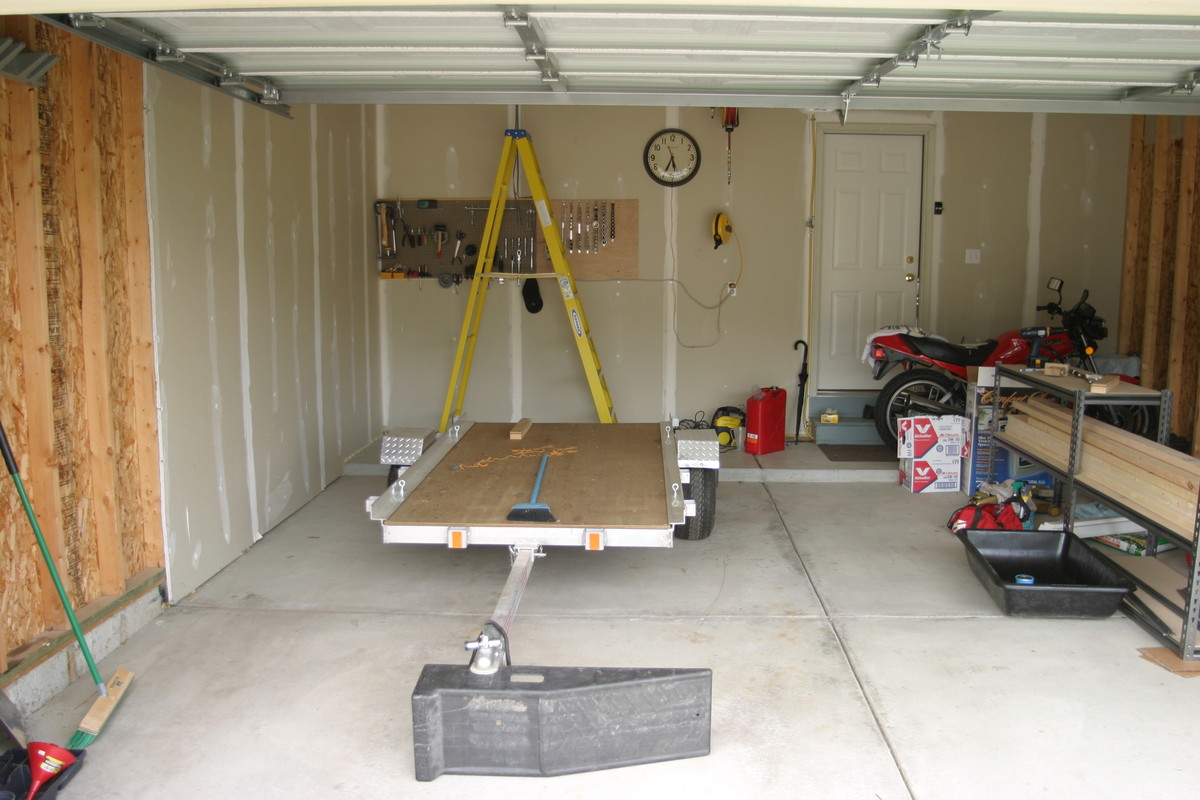
For all its benefits, the trailer did cause a very big problem. Where to put it? I didn’t want to waste half my garage just to keep my trailer. Actually, I already had a plan before buying it. I had decided to hoist the trailer onto my garage ceiling when not in use. So once I had purchased the trailer… I was committed to engineering a working trailer lift / hoist solution.
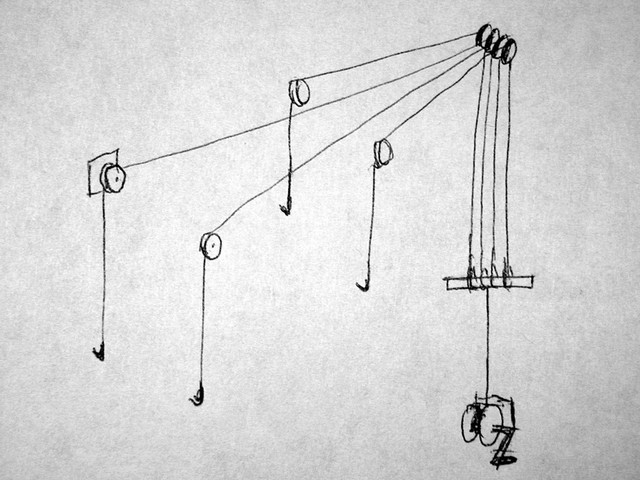
Initially I contemplated a manual cranking hoist (as you can see in this early sketch), but quickly changed my mind to a motorized hoist.
It is important to note the differences between a hoist and a winch:
A hoist is for lifting and a winch is for pulling.
A Winch is geared for pulling a load on a relatively level surface. A winch uses a dynamic brake that must slide.
A Hoist is geared to lift (dead weight) and has a locking brake that can support a “hanging” load.
If a Hoist can lift (dead weight) 250 lbs., then it may be capable of pulling 1000 lbs rolling weight across a hard packed surface. If a Winch can pull 1000 lbs. across a hard packed surface, it may only have the capacity to support 100 lbs. (dead weight) because the winch employs a different braking system than that of a hoist.
A Hoist is used for lifting and supporting “dead weight”.
A Winch is used for pulling (moving rolling weight).
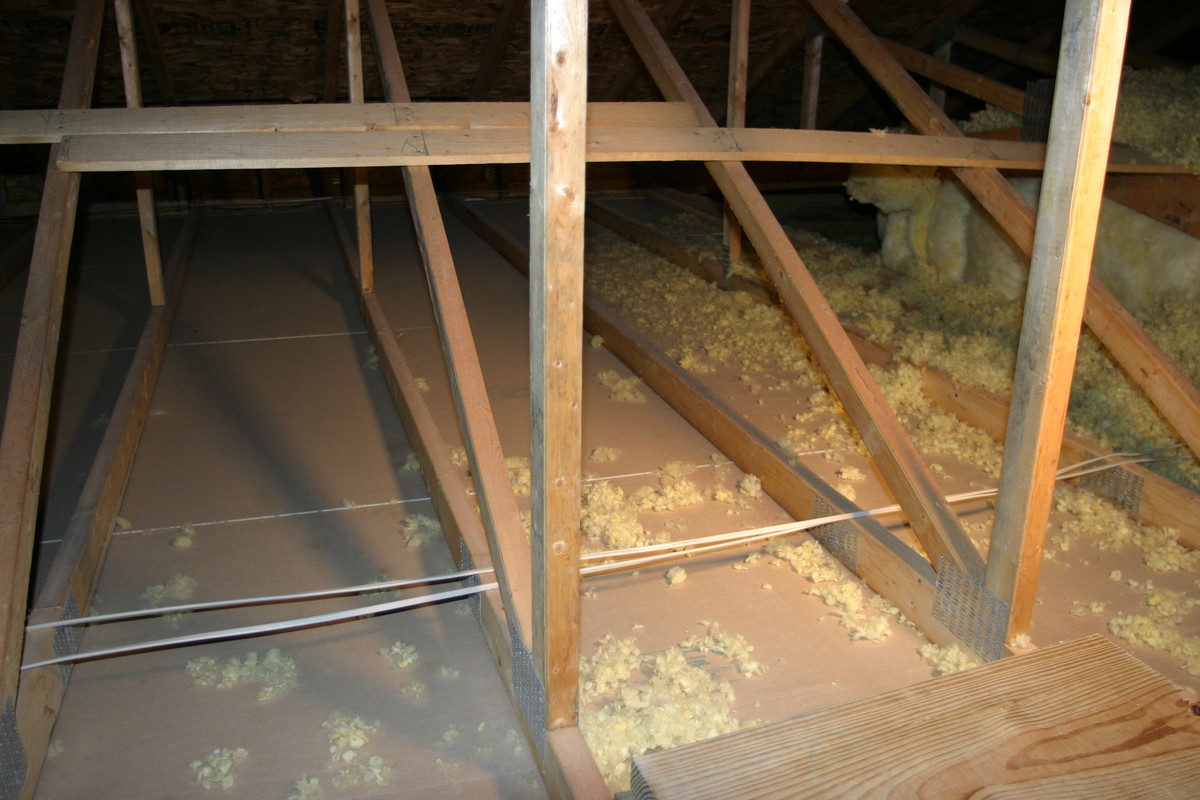
This is the space above the garage ceiling. I had to customize a mechanical solution that would fit in this space. Let the engineering begin!
Luckily, I have experience with many computer graphic tools. This allowed me to visualize my ideas and confirm the alignment of the cables through the trusses.

For those who might be curious… these renderings were done with 3d studio max and mental ray rendering engine.

Here you can see the engineered trusses of my Pulte built home. It’s deceptively strong. Combined with the fact that my trailer is made of aluminum and is only 700 pounds… means my garage ceiling easily carries the load.

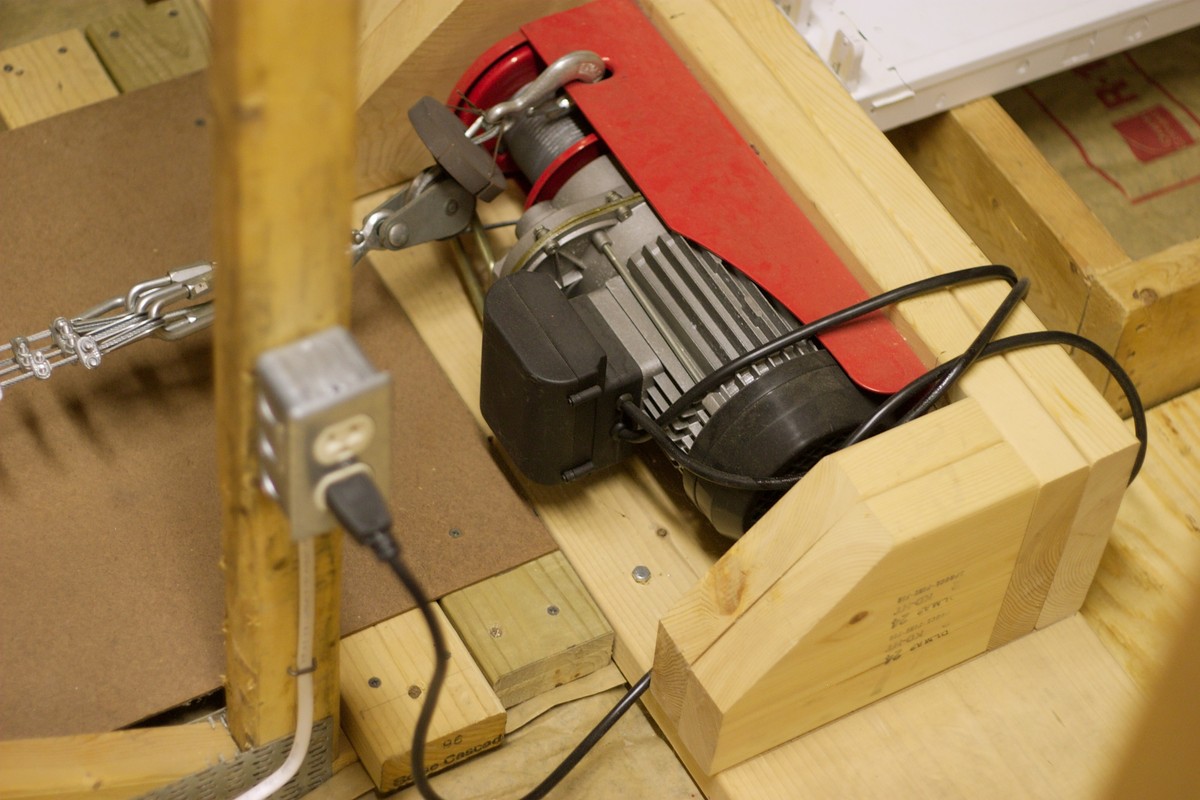
The hoist cost me only $70 at harbor freight. Unfortunately, as you can hear in the above video, the hoist had some broken plastic parts rattling inside the gearbox. So I had to exchange it and install a replacement which has worked flawlessly since. Here you can see the hoist and the beefy structure I built to ensure the it wouldn’t come undone from its’ mount.
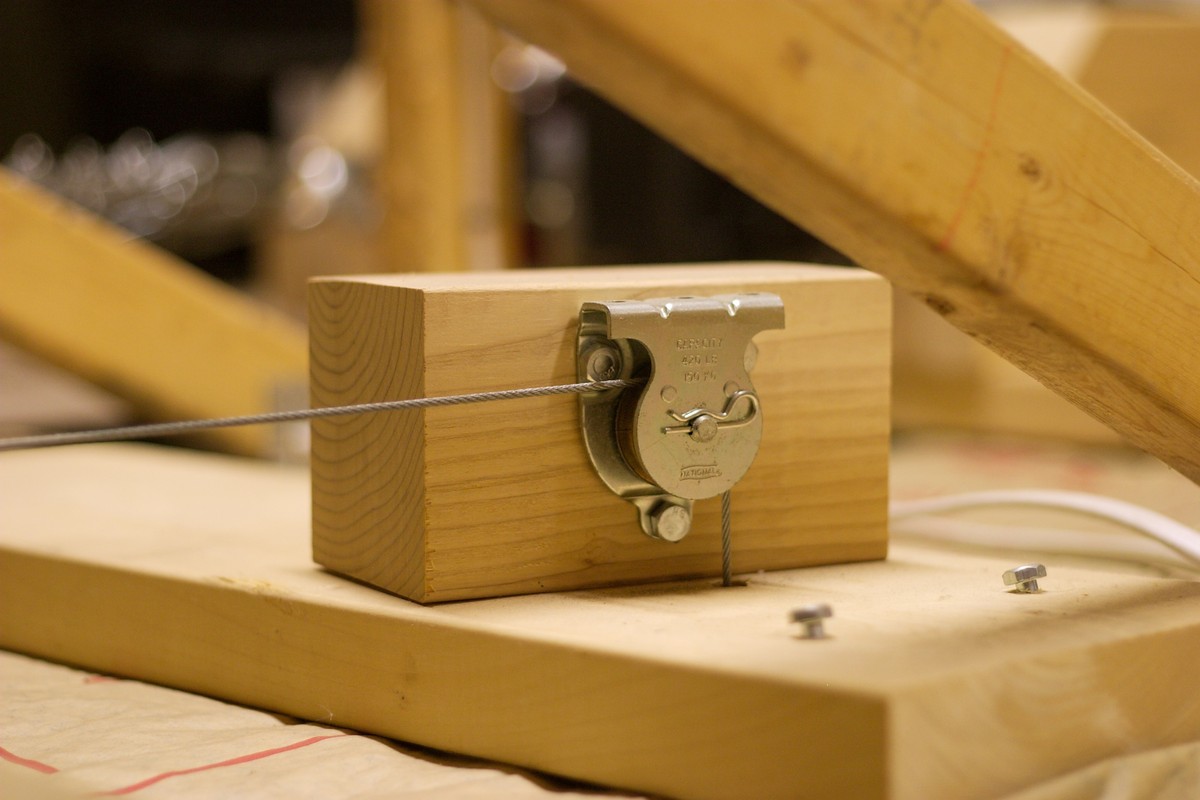
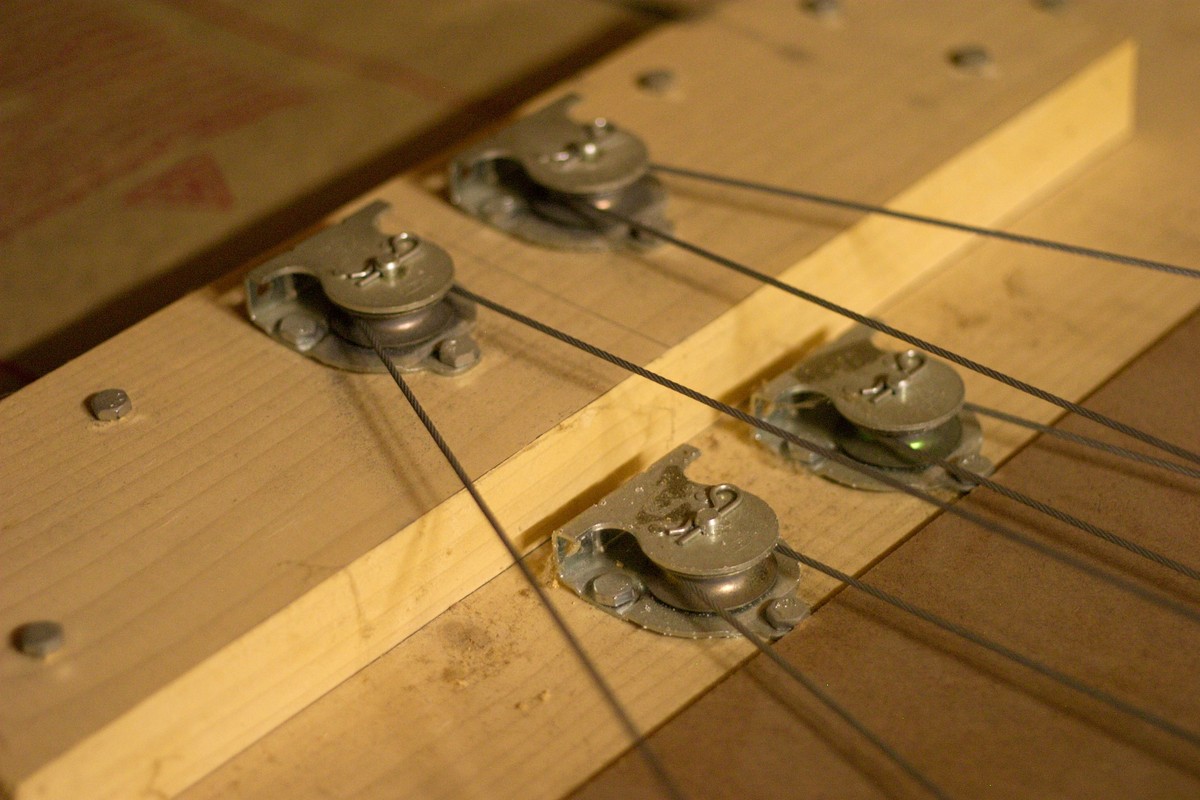
I used lag bolts to hold most major components together. Here you can see how I redirect the cable downward through the ceiling at each of the 4 points.
The same pulleys were used to redirect the 4 down points to the single connection at the hoist.
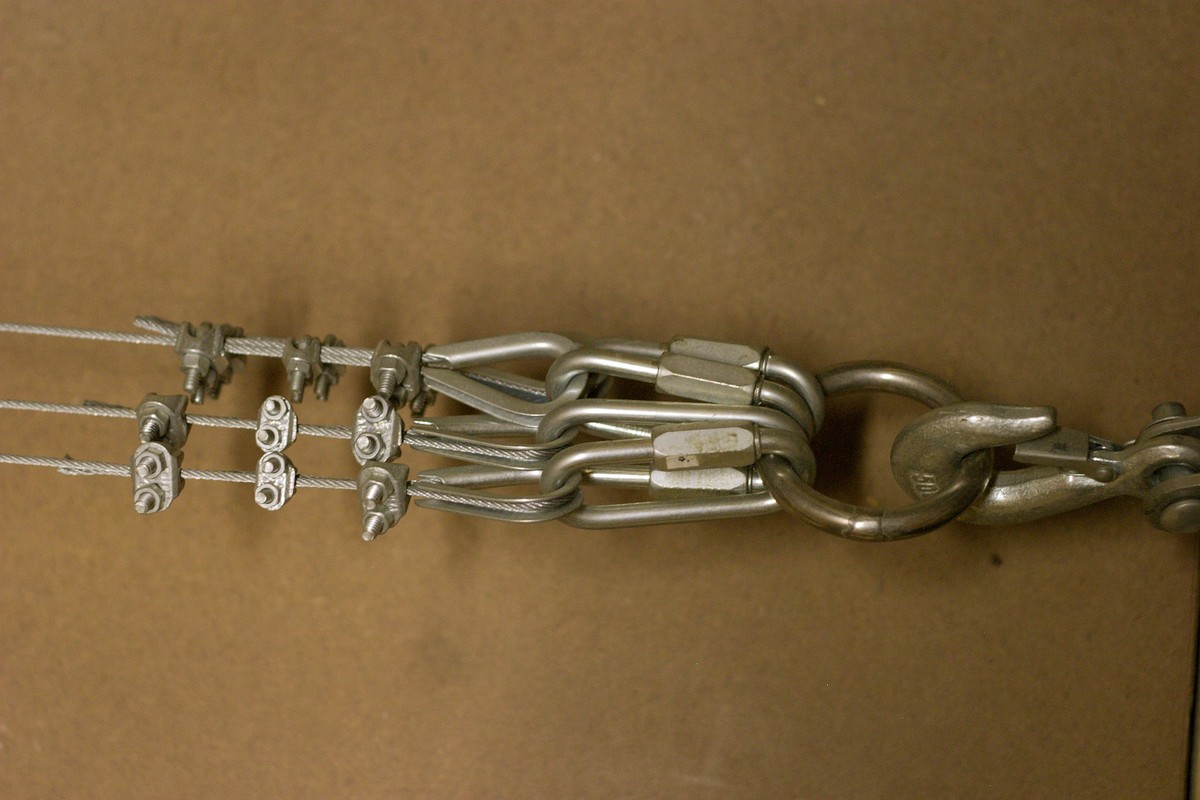
The strongest link in the chain… a single stainless steel ring with a very high weight rating is connected to 4 carabiners and then the 4 cables. Do you think 3 saddles is overkill for each cable?
This is one of the 4 drop cables just after coming through the ceiling. I added some rubber coated lead weights to maintain tension on each line when the trailer is detached. I did this to reduce the chance a cable would fall off a pulley track.
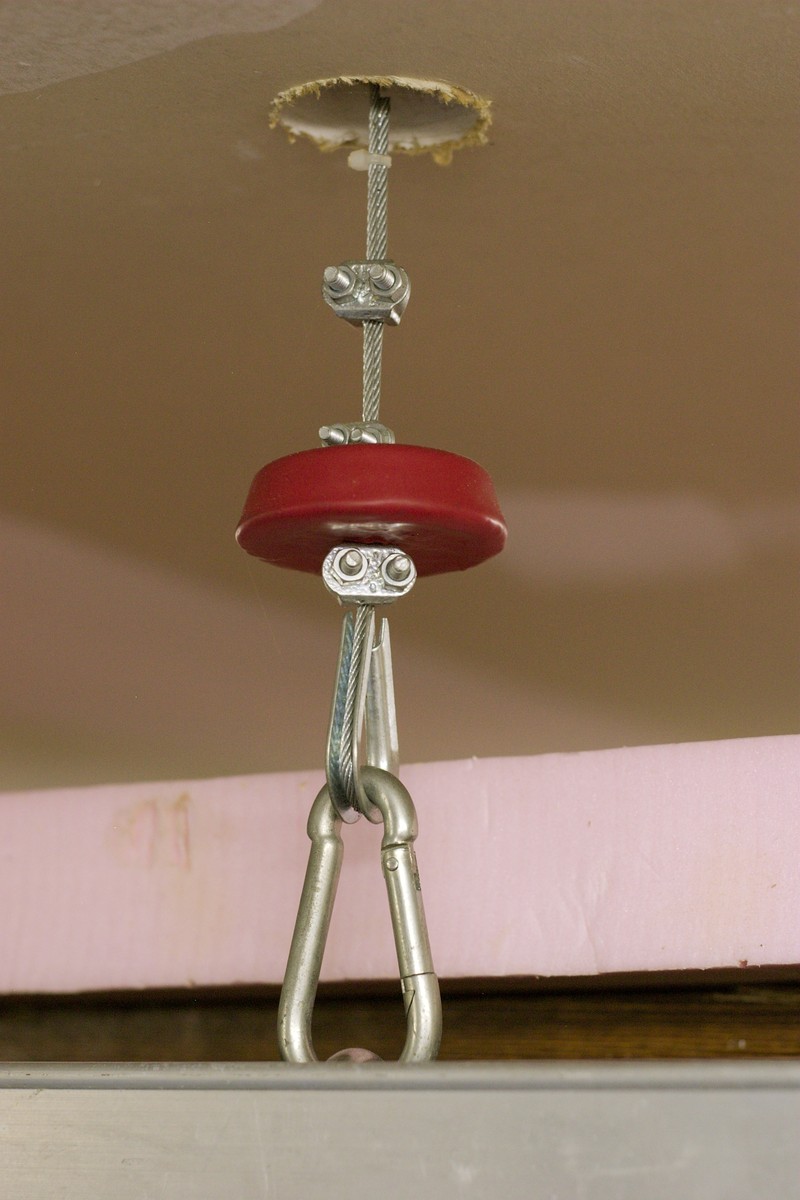
There are 4 additional STATIC lines where I connect the trailer after it has been fully lifted to the ceiling. Therefore, the trailer has 8 lines connected to it when it is on the ceiling.
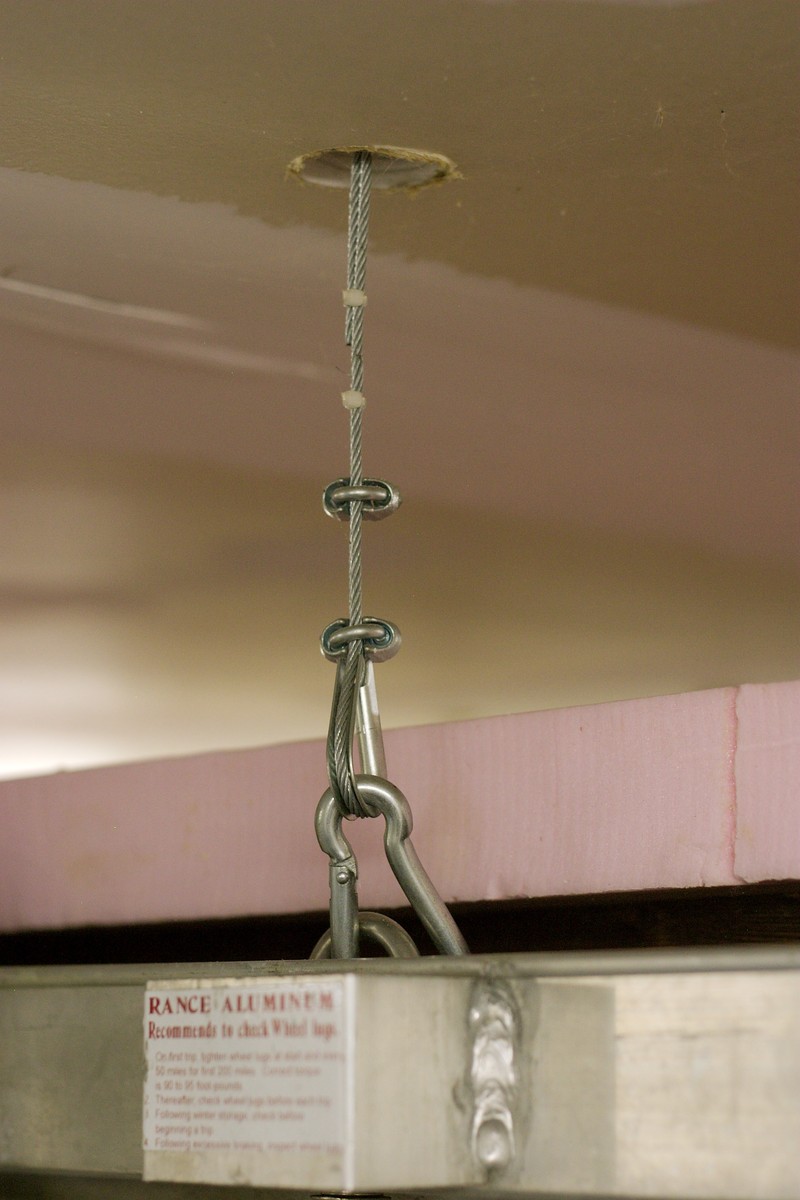
Here you can see 2 static lines and 2 pulley lines on the left side of the trailer.
Watch my garage trailer lift video.
Check out some other garage trailer lifts:
http://panofish.net/garage-trailer-lift-3/
http://panofish.net/garage-trailer-lift-4/
My mistake, if not around the topic. I had slightly embarrassment. I randomly missing my essay and I urgently need to have to create a new one particular. I can not write with my personal strength, so I wanted to apply towards the essay writing service for cash. Discovered several web content about this, but I do not know in the event you can trust these web-sites. Has anyone heard of the https://csbbet.com/the-transformation-of-on-the-net-creating-products/
???
I also wanted to ask, did somebody encounter such an issue? And what will take place if they discover out that my paper was bought, and not written by me
I have checked your site and i’ve found some duplicate content, that’s why you don’t rank high in google, but there is a tool
that can help you to create 100% unique articles, search for: SSundee advices unlimited content for your blog
Hi Alan,
Thank you for sharing your design and instruction!
I have been wanting to get the car roof box but didn’t know how to lift it up and down. This is perfect!
What is the size of your hoist? Should I buy a double, triple the weight of what I want to lift?
All of my components are rated to carry at least 3 times the load, but make sure you don’t get too thick of a wire cable and avoid coated cable. Otherwise, the cabling won’t have enough flexibility to nicely bend over the pulleys. It’s a good idea to read through all the comments in this thread, since I answer many other really good questions on this topic.
Hi Alan,
Thank you for your reply! I have started setting up and have a question. Did you get new bolts to hold the hoist to the block wood? The hex bolts that go with it seems very short to go through 1×6 plywood?
Yeah, I bought new bolts and plenty of good hardware. Over engineering was the key to safety.
Hi Alan, I just got my set up done. However, I didn’t hold up the lead weight at the hoist so the line doesn’t roll up and down smoothly after the third try. I’m trying to look at your set up of how you got the weight tight up at the hoist. It looked like you cut into the weight so you can tighten around it to hold it up?
Great set-up! Can you send a link for the rubber coated cable weights? I am not sure even how to search for them.
Thanks!
Love this whole thread. You guys are getting it done. I’m emulating this design concept, but on steroids. I’ll be lifting a 880lb Criagcat & trailer (CraigCat.com) with a three point lift design. Two lift points will carry bulk of load at 420lbs each at trailer axel and the third lift near the hitch. These loads mean larger cables/pulleys, 7/32” (6×37) SS Aircraft cable with 3”dia pulley blocks (Tuf-Tug 3” rated 2000lb). With these loads my plans will include a 6” steel channel tee design with no loads going into the trusses except the wt of the HF 2000lb hoist. Outside concrete block bearing wall will carry one end of tee top and the other unfortunately will require an Adjustment-a-post going to the garage floor, but in a Little used area of the garage.
@Dale Parker… I would love to see your progress when you get it working. You can send pics to my email if you like at panofish@gmail.com
Hi Alan,
Great project, very inspiring use of space.
Could you share what make and specification that trailer is please? looks really handy
@Charles The trailer is a Rance Aluminum Utility trailer called a rough rider. They don’t appear to make this same model trailer anymore. The closest model is a bit bigger. It’s a shame because this trailer is near perfect for practicality. It’s bed is 4’x8′, so it can carry plywood or drywall. I can attach or remove the rails I made depending on what I need to haul. It even has a removable pin that allows it to tip back… so you can drive a small yard mower or atv or such onto it. IMHO… it is the perfect trailer.