How to Measure Drill Press Speed

January 26th, 2007 3 comments

My new drill press was a big improvement over my old 8″ Delta.  It has many great features and didn’t cost too much.  But I soon noticed a problem.

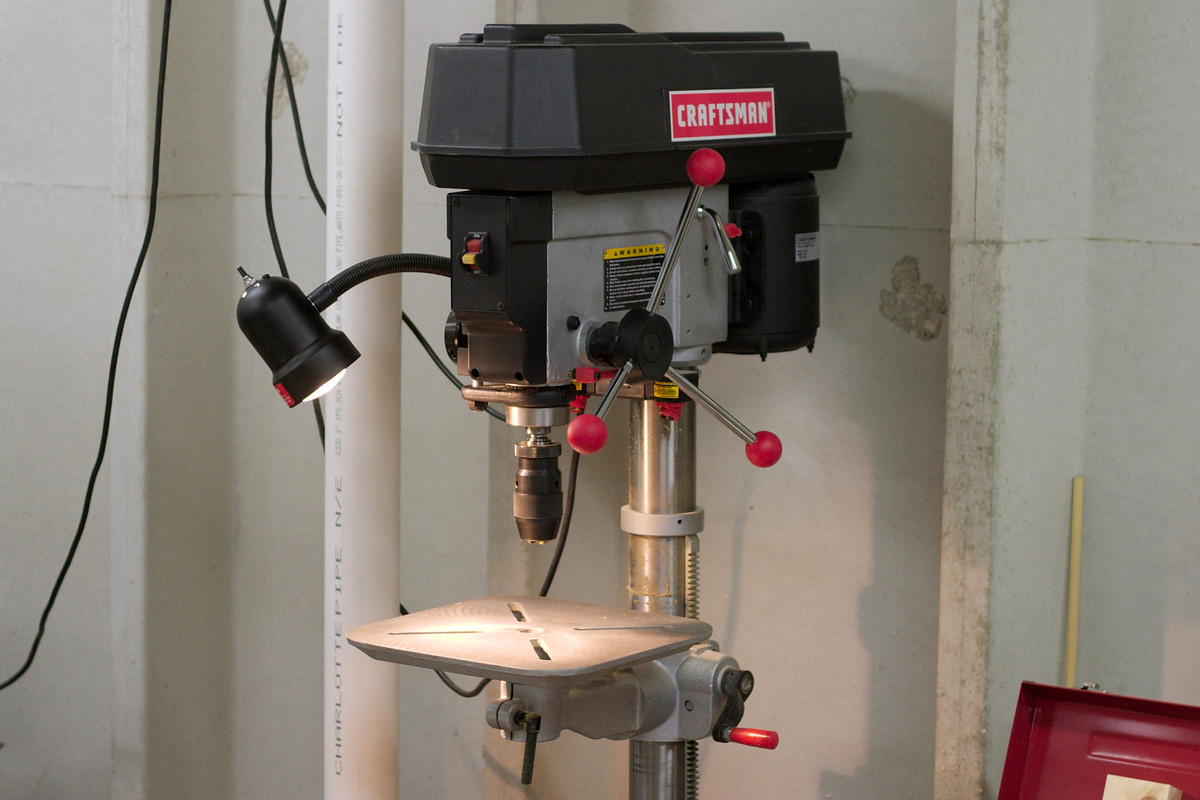
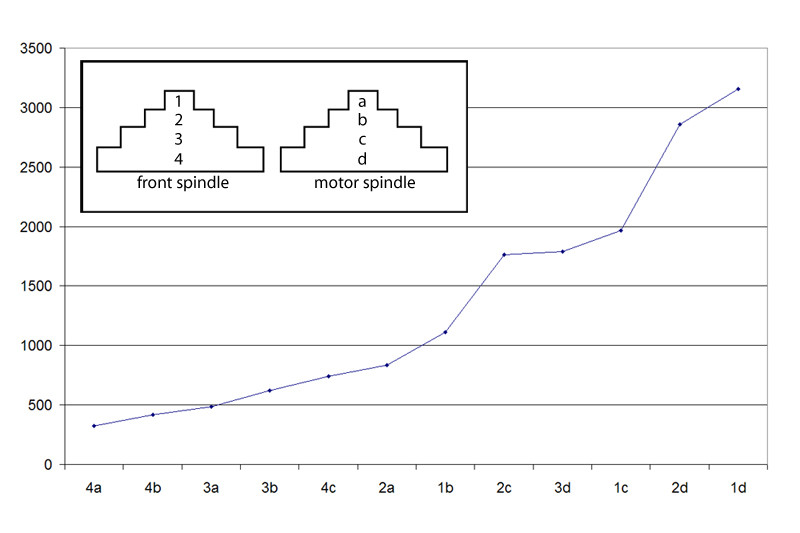
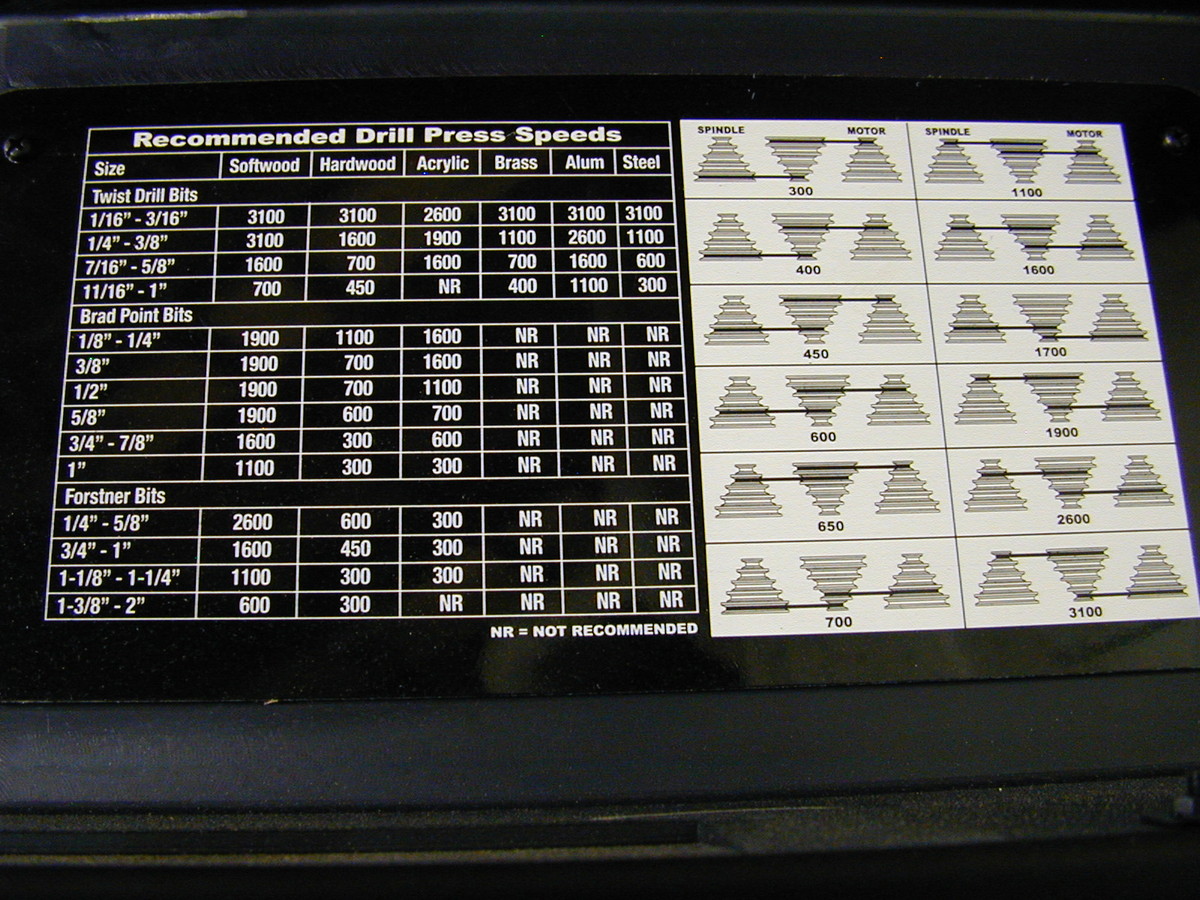
I noticed something strange about the speed chart under the top belt cover.  It represented a 5 tier pulley setup, but the drill actually has a 4 tier pulley.  That made it impossible for me to determine the actual speed of the drill.  I could still judge the relative speed, but not the actual speed and this really bugged me.

I needed a method to measure the speed of my drill press.  I have an oscilloscope  and I realized with a little rigging… I could use it to measure the speed of my drill.

First I coiled some wire on a nail.

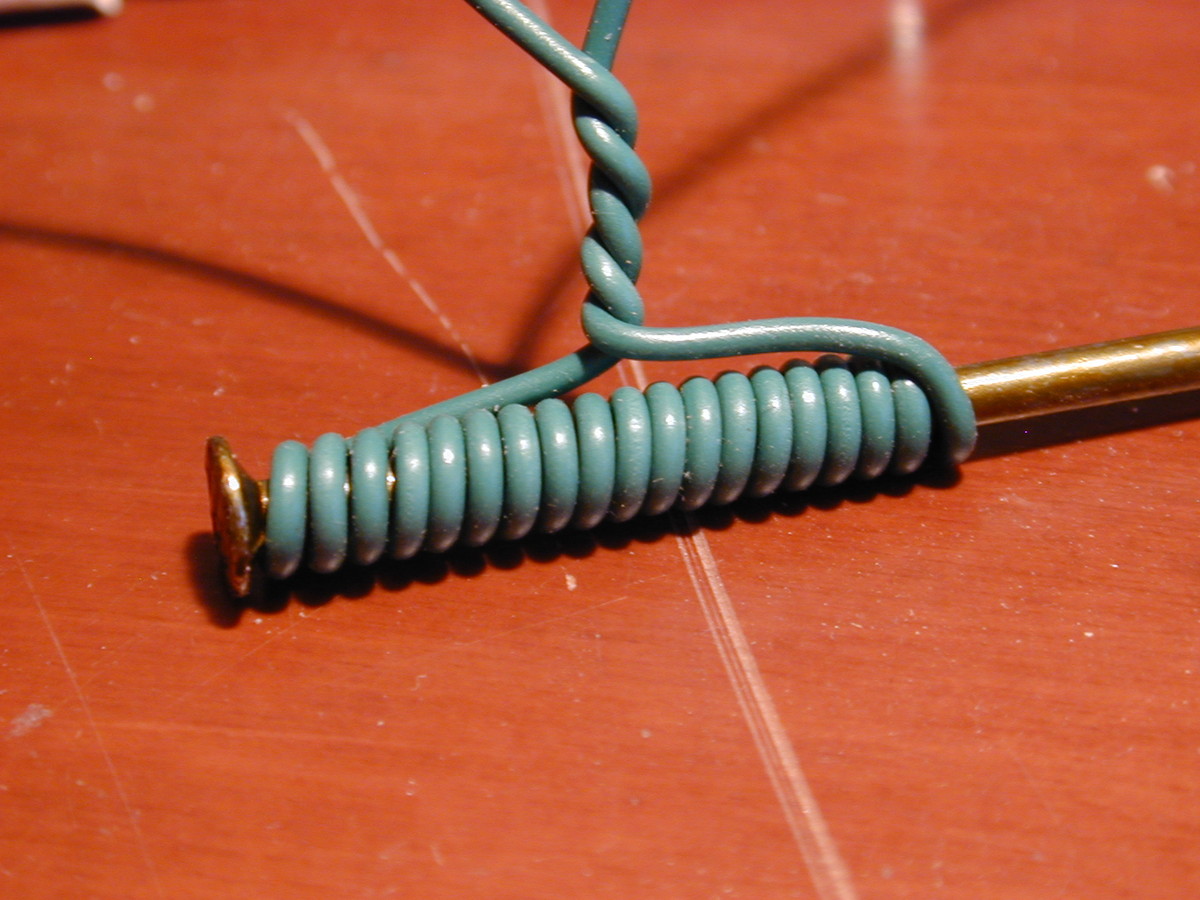
I stuck a strong small magnet on the chuck and clamped the coiled nail near the chuck, so that the magnet would spin past the coils of the nail.

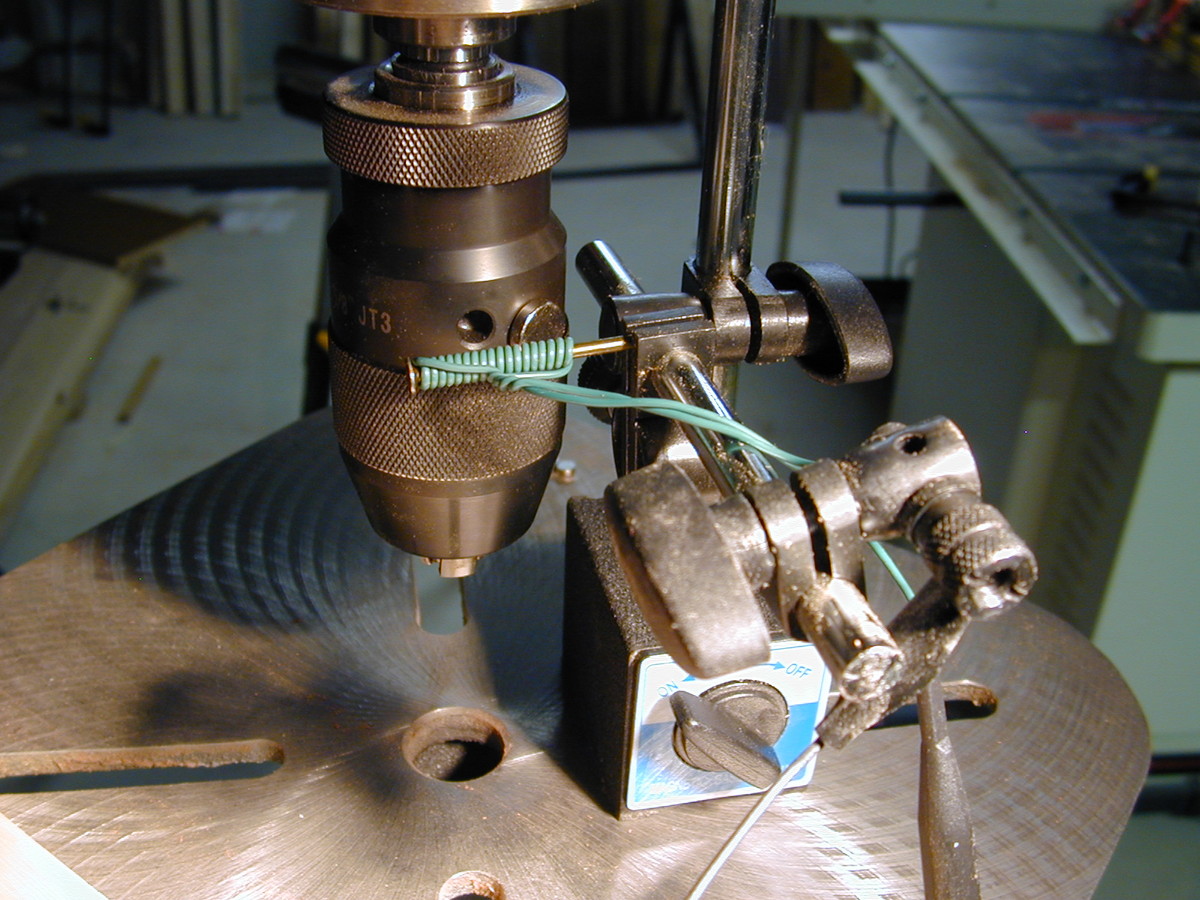
Eureka!  Once I hooked up the coiled wire to the oscilloscope and turn on the drill press… The magnet induced a small current in the wire that appeared on my scope.

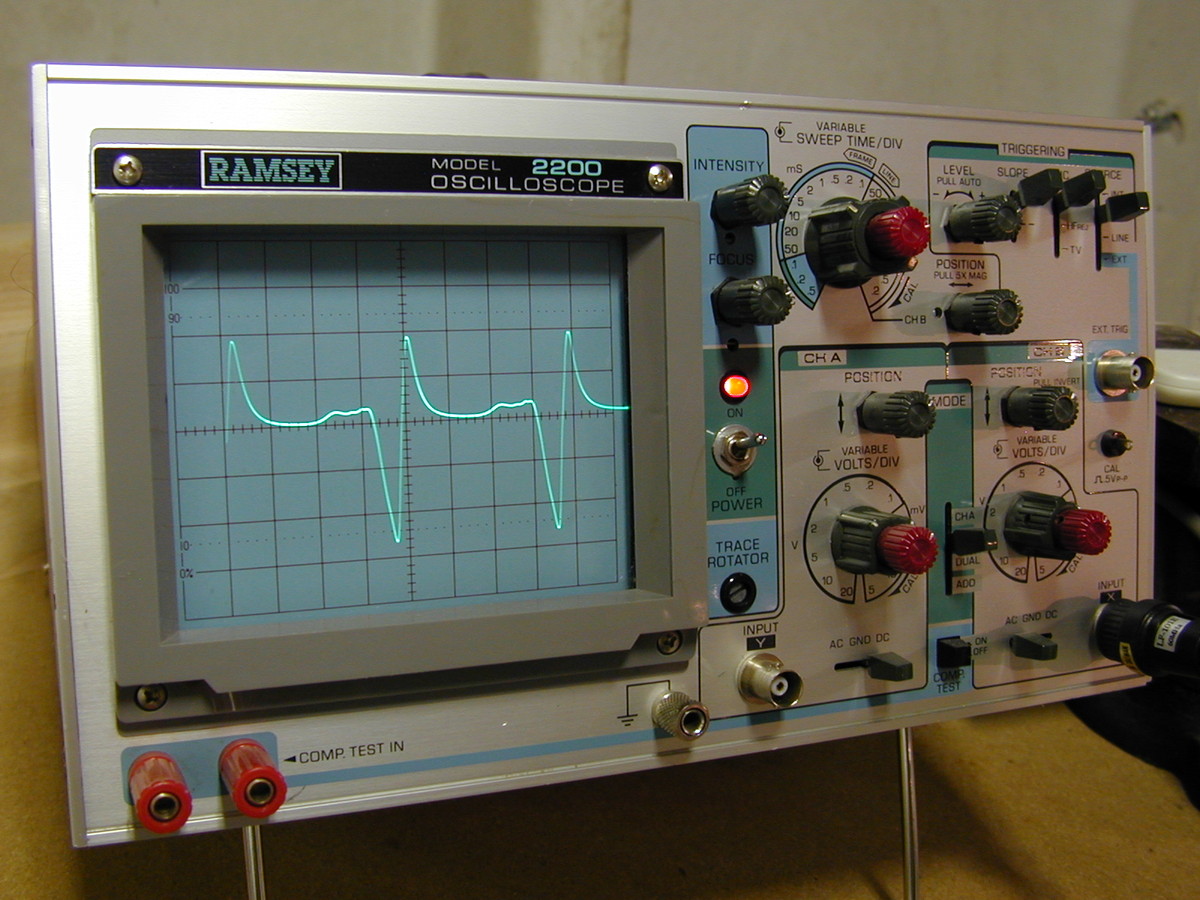
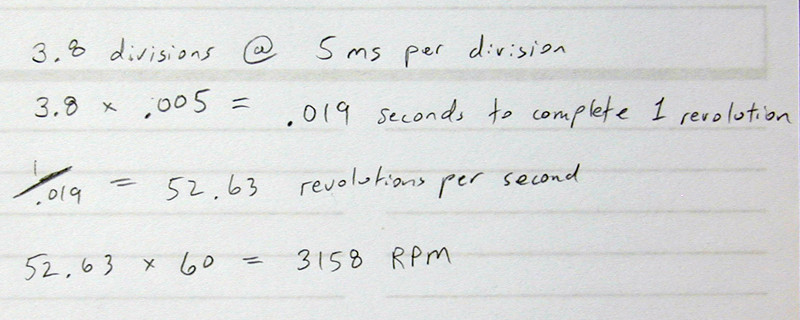
Now all I needed to do, was to employ my college degree (BSEE) and calculate the RPM of the drill.

I repeated the measurements for the entire range of the belts on the spindles.  Then I graphed the results.   It’s interesting to see how non-linear the graph is.  I stuck the new chart on my drill and now I have a very exact reference for my drill speeds.

Categories: Woodworking, Gadget Tags:

Building a Bookcase from Scrap

January 23rd, 2007 7 comments

These are the remains of a desk hutch that I had bought from the “House of Denmark” store years ago. It was a nice hutch with teak veneer, but was no longer useful with my modern 24 inch flat panel monitor.

I decided to try and make a bookcase from these pieces.

I didn’t spend much time designing the bookcase. I just wanted to maximize the use of available material and minimize waste. This is the quick pencil sketch I did.

The trickyest part was the backer for the bookcase. The hutch used a partial backer board. It wasn’t going to be big enough for my bookcase. So I ripped it into thirds on the tablesaw and then resawed them on the bandsaw. Then I could plane the strips to equal thickness (yes you can plane particle board) and glue them to a single sheet of plywood. This gave me a large continuous sheet of plywood with teak veneer covering one side.

Here is the result after much thought and effort. To make the boards the correct length took extra effort because I had to trim the endcap veneers with the tablesaw, crosscut to length and then glue the endcap back on.

The result is much better than any of the $50 particle board bookcases I found in stores. I was surprised at how hard it was to find a SOLID, non-saging, non-particle board bookshelf.

Categories: Woodworking Tags:

Building a Shed under a Deck

January 5th, 2007 169 comments

How to build a shed under a deck. The following youtube video covers some important factors to consider when building such a deck.

I used 3dsmax to model my deck and shed.
I recently converted the 3D deck & shed plans into sketchup so that others can benefit.

Feel free to download the sketchup file and use Google Sketchup to view, measure, and modify my shed/deck plan for your own use.

FREE Google Sketchup Plans for my deck and shed.

Back in 2001 my new home needed a deck. I designed a deck that was small and simple.
The 2 posts and single beam were massive screwed and glued planks.
I am proud of the fact that I single handedly designed and built my deck.
It was a lot of fun figuring out how to lift that heavy, wet, pressure-treated beam onto the posts all by myself.
The posts weren’t small either, when you consider they are almost 6 feet underground!

Overkill should be my new middle name.

Designing my deck with only 2 posts, allowed plenty of space for a shed.
The first stage of building my shed was to build the roof within the joists of the deck.
This stage took a long time and a bunch of thought.
I decided to build an angled trough system with curved sheets of aluminum flashing.

Here you can see the underside and the gradual slope for rain runoff.

This was an incredibly tedious process. I used a large quantity of industrial caulk to seal the aluminum to the joists.
This tedium will be worth it because it maximizes my sheds headroom.
I’m 6′ 3″ and there is just 1″ of headroom from the joists.

The next time I need to cut bricks… I’ll get a diamond blade.
It sure took me a long time to cut them with an abrasive disc.

The shed roof survived the winter and showed no leaks. Now the next stage. I had a concrete pad poured. I decided to put my shed entry on the left side of the deck, so I had to dig the hillside down and create a patio for the doorway. This summer was incredibly hot and moving my sprinkler lines was no fun.

It’s took an eternity to figure out how to build the walls. I had to leave a gap between the walls and the deck. I expected the concrete to heave in the winter.

My excitement is building and I can see the light at the end of the tunnel!

The doorway is short and non-standard. I had to build a custom double door.
Another month or so would pass before I could finish my custom shed doors, but I’m happy with the result. I wanted my shed to look as nice as I could make it… so I wrapped it in matching vinyl siding. My trailer-lift project may have been my most gratifying project, but my shed has been the most useful. Good thing I allowed space for the concrete to heave in winter… because it did just that!

YAAA! My garage is clean and useable again.