Incra Jig

March 28th, 2011 Comments off

I bought an incra ultra lite dovetailing jig to build some boxes with my router table.

Problem: How to attach my incra jig to my tablesaw/router table without drilling holes.
Solution: Cheap harbor freight locking magnets.

As you can see in the photo… I attached the incra jig to a piece of MDF.
Clamping the board to the table was not practical because the tablesaw fence system made it awkward.
Then I attached 4 magswitches to the MDF.  2 would probably do the job, but I like overkill.

A couple of handles make it easier to pick up.

Now it’s quick and easy to install or uninstall the incrajig.

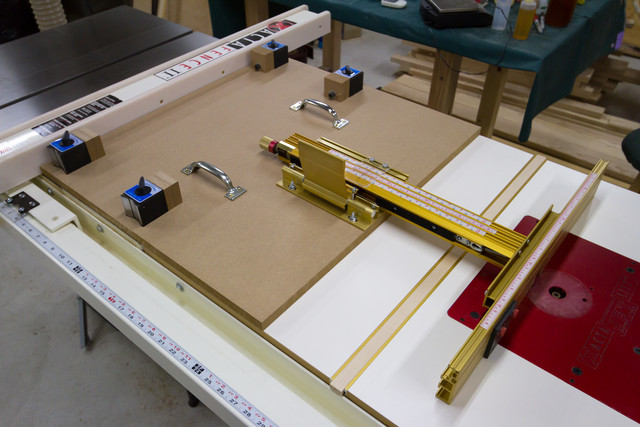
Lock my table saw fence.
Slide the incra jig MDF against the fence.
Lock the 4 mag switches.
Adjust the incra fence as needed and enjoy.

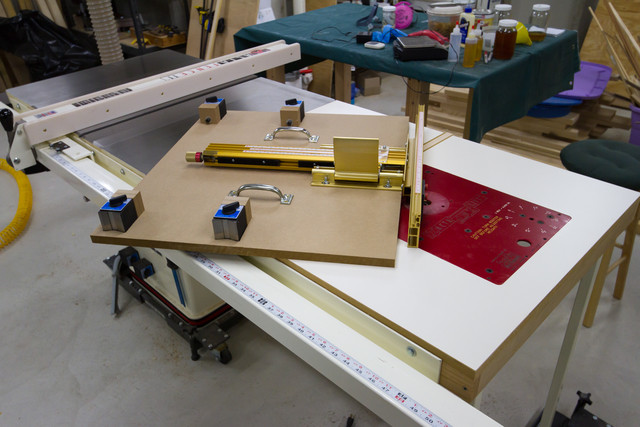
The magnetic switches are typical machinist mag switches from Harbor Freight.. real cheap.
I just had to cut a hole for each through the MDF and bolt them with a small block of wood to the MDF.

Therefore, the magswitches are solidly attached to the MDF which I also bolted my incra jig to.
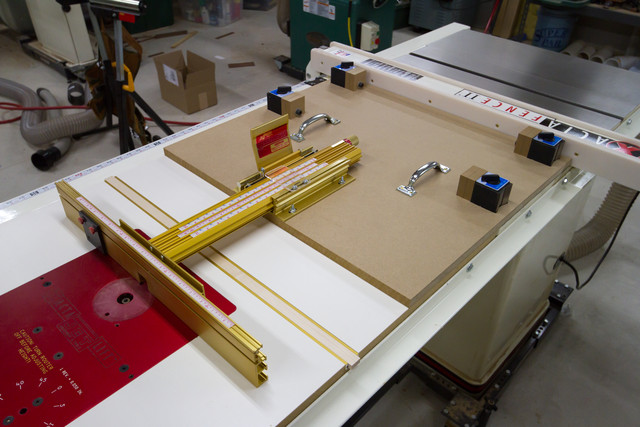
Because of the holes, each magswitch is in contact with the tablesaw’s metal surface.
When I turn on the switch, they lock down with some serious force and make the whole jig immovable.

Actually, I am using the term magswitch generically.
The magswitch company makes some awesome magnetic switches in several sizes and styles for woodworking.
However, in my opinion they are a little pricey, so I used Harbor Freight magnetic bases.

Note: these magnetic bases are traditionally used by machinists to clamp dial gauges to metal surfaces.
Also, the magnetic bases are magnetically switchable on 2 sides.

http://www.harborfreight.com/multipositional-magnetic-base-with-fine-adjustment-5645.html

See also:
http://panofish.net/basement-woodshop-tour

Categories: Popular, Woodworking Tags:

Canon Lens Comparison

February 12th, 2011 Comments off

I have 3 lenses for my Canon 7d Camera:

1. Canon 50mm f1.8 – $75
2. Canon 10-22mm f3.5 – $700
3. Canon 85mm f1.8 – $400

A friend lent me his 50mm f1.4, so I decided to compare the Canon Lenses.
This is not a scientific comparison.

The build quality is very similar for all, except the 50mm f1.8, which is very plastic and flimsy.
I shoot a lot of photos indoors and low light capability is important to me, so low f-stops are a must.
If you have a 7d, then you won’t find a better wide angle lens than the 10-22mm at any price.
The best walk around prime for under $600 is the 50mm f1.4.
If your on a budget, then the 50mm 1.8 is an excellent substitute.
If you need a medium telephoto for your 7D, then the 85mm f1.8 is fantastic for the price.
You’ll have to almost double it’s cost to find something better… like the Canon EF 135mm f/2.0L USM.

Which lenses do I plan to buy next?

1. Canon 50mm f1.4 – $350 (best all around lens)
2. Canon EF 100mm f/2.8 USM Macro – $570 (great macro and telephoto)
3. Canon EF 70-200mm f2.8L IS II USM – $2374 (This is the ULTIMATE lens)

The 85mm really soaks up light (as you can see by this pic) and it has the best focusing mechanism… very fast and silent.
The 50mm 1.4’s focusing is very reliable as well, but the 50mm 1.8 does a bit more hunting for focus.
The 10-22mm can get the closest to the subject and is super sharp.. which allows me to use it as a substitute macro lens.

I shot a picture of monkey and domokun with each lens with similar iso and f-stop settings.
The images were processed through lightroom 3 without any tweaking. I wanted to compare color and sharpness.

I shot a close up a a rose with monkey in the background to compare bokehs.

My conclusions:
The 50mm 1.4 is the winner for overall sharpness, color pop, and bokeh.
The 85mm 1.8 is super quick and phenomenal as a medium telephoto and portrait lens.
The 10-22mm has no competition in the wide angle lens category for a crop sensor 7d.
The 50mm 1.8’s build quality is very cheap, but the results aren’t too far from the 1.4 version.

You can download the full resolution images for a better comparison.

I recommend faststone image viewer as a great windows image viewer. It’s fast, free, and flexible.

Similar posts on panofish.net:

Aperture vs Lightroom3 vs Bibble Pro
Canon 7d video noise removal

Categories: Computer Tags:

Satin French Polish

January 16th, 2011 4 comments

French polishing can produce a super beautiful high gloss finish that few other wood finishing techniques can match.
I know my technique isn’t really a french polish, but more my own simplified variation.
I am satisfied with my compromise technique as I don’t really want to fill the pores and have a high gloss finish.

My finish has 2 huge benefits…it’s the fastest finish I can do and the best looking finish I can do.
The only downside is durability, but picture frames don’t need it.

The finish begs to be touched… silky smooth, yet you can still see and feel the pores of the walnut.
It reminds me of some antique walnut finishes.
I like this shellac finish with fewer coats, which produces a satin look that enhances the natural character and grain of the wood.

I was able to achieve a gorgeous finish on 10 picture frames in 1 afternoon.
It would have taken me several days if I had used my other favorite finish (arm r seal), because of the slower drying time.

Here’s what I’ve learned about this finishing technique so far:

  1. It’s important to apply the right amount of olive oil to the pad each time I load it with shellac.
  2. Work fast and know when to stop and reload the pad.
  3. Use a dry clean cloth to softly even the finish just a few seconds after applying

Here’s link to a super close up pic showing the open pores of the beautiful walnut.
I’d hate to fill them in and lose all that character. SUPER CLOSE UP PHOTO

What do you recommend to achieve a great french polish finish?


Categories: Woodworking Tags:

Garage Trailer Lift #4

January 13th, 2011 3 comments

Andre’s Garage Trailer Lift is sweet!
Be sure to check out my lift, the boat lift, and another lift on my blog.
Here’s what Andre had to say about his lift.

These 2 pics are before any changes…I had a manual crank in the rafters on the left to pull my trailer into the rafters…had it for about 25 years. I am now finishing the garage…and that is when I decided to upgrade my winch to something electric.


Initial work with new Steel I beam and new joices (2×8) all across to support new ceiling and to also reinforce the initial trusses of the structure.


Lift pulley and concentration point for the 4 lift cables.

2 more in the attic showing the layout of the hoist and cables…..pretty much like your setup…. In my case, the cables are running between the top of my new ceiling (joices 2×8) and the bottom of the original trusses for the garage structure…I have 3 inches of clearance and that is where I am running all my cables, electrical, etc… At this stage…reflecting on the implementation, I did not anticipate that my trailer would be lower to the point where the tongue is now an obstacle when I open the garage door…my fix will be to get a bracket welded on the side of the trailer so that I can swing the tongue on the side of the trailer and lock it safely sideway…it was in essence my old layout where the tongue was swung to the side and hel in place by a cable loop thru the rafters…you can see from the original setup…


Some details on the lift point and the trailer up for the first time…security back-up lines not in place on those pictures..


Some more details on lift points…used a plastic pipe up in the ceiling to run the cable thru so that the insulation that I would insert afterwards would not get caught on the cable… Works well…my weight were bought from a fitness store…2.5 lbs each…should have picked something heavier 5 or 10 lbs


Hidden ladder to attic. And more complete view…..work still underway..insulation , drywalling, lighting, etc…3-4 weeks to go

Thanks again for sharing your video and detailed plans….

Categories: DIY Tags: